| Posted | Message |
|---|
EDanaII
10/9/2006 11:54:33 AM | Back in August, Frans Van Humbeek contacted the old forum concerning any surviving members of the Hard Seventeen. He has since contacted my father, Ed Dana 1 and was kind enough to provided us with actual photographs of dad's downed plane in Grimbergen, Belgium.
Dad and I were planning a return trip to England and were even planning a possible trip to the crash site but dad could not remember where it happened. Because of Fran's kindness, we now know, not only what town the crash occurred, but, quite possibly, the actual location of the crash, itself.
Thank you very much Frans. And thank you, Donald Byers, for passing the crew information on to him.
As a result of all this, I am considering recreating the Hard Seventeen as a scale model and presenting it to dad once we get to Belgium. I've searched the web and this site for the proper colorings for a plane of the 401st at Deenethorpe. Perhaps I missed it, but can anyone point me to color photos of the markings of the 401st bombers? It would be appreciated.
Also, as best I can tell, the Hard Seventeen had no nose art, nor any lettering labeling it as the "Hard Seventeen." At least, I see no obvious markings on the images Frans provided. If anyone has any information to the contrary, it, too, would be appreciated.
And, for any who are interested, we cleaned up those images and have posted them here: http://www.EdwardGDanaII.info/Album/
Enjoy.
Ed Dana II.

|
Paul Bellamy
10/10/2006 8:39:28 AM | Nice photo's Ed,
Regards the colours of your Father's plane, the photo's seem to show a bare-metal finished B-17.
The colours on this aircraft would be olive drab anti-dazzle patches on the inner sides of the engine cowlings, and in front of the cockpit windows.
The tail would have the yellow diagonal band outlined in black, with the Triangle S being white on a black triangle. The squadron code IW J is in black, between the waist gunners windows and the horizontal stabilisers.
The National Insignia would have a blue outline.
Here's a colour image of another 614BS aircraft's tail as an example:

Hope that helps,
Paul
Paul Bellamy

|
EDanaII
10/10/2006 9:12:33 AM | Excellent. That does, indeed, help, Paul. Thank you very much.

|
Paul Bellamy
10/10/2006 9:22:32 AM | You're welcome Ed.
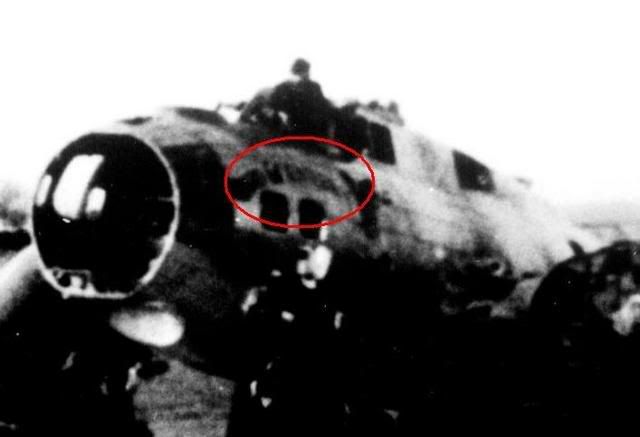
Looking at your photo's again, I noticed what may be part of the name written on the nose, above the navigator's windows.
Just a thought.
All the best,
Paul
Paul Bellamy

|
EDanaII
10/10/2006 9:37:21 AM | I noticed that too, Paul, but if you look at the either the "cleaned up" photos or the originals, nothing appears there that I can see. We used a professional service to clean them up, but it's possible they blurred out that detail.
Frans Van Humbeek has suggested I check the Smithonian and the USAF archives, so, one way or another, I will see if I can resolve this issue. 🙂

|
donaldbyers
10/10/2006 9:40:16 PM | I looked into the B-17 Nose art Directory and it indicates no picture available for this aircraft.
Good luck on putting togeather a replica of the aircraft I know he will appreciate it. What scale are you thinking of using.
Don Byers
Lubbock Texas
Sgt. Donald C. Byers, 613th Bomb Squadron, Togglier, 42-97344 Carrie B II, KIA 08/24/1944.
|
EDanaII
10/11/2006 8:45:39 AM | I sincerely doubt that the Hard Seventeen had any nose art. Dad doesn't recall any and that's part of my problem. He "can neither confirm nor deny" any nose art for the plane which leads me to conclude that, if there were art, he'd be more likely to remember it.
Although, re-reviewing the photo that Paul highlighted, I can't shake the feeling that maybe the name was printed on the side. I just wish it had shown up on the other images.
I've actually done this before. About thirteen years ago, I constructed a 1/48 scale replica of the Memphis Belle to help dad explain to his grandchildren what it was that he did during the war. If I had known better then the differences between the B17G and B17F and in color schemes between the different bomber groups, I would have done that model differently. So this time, I intend to do it right.
So, to answer your question, It will be a 1/48th scale model too. I need to find a good quality model kit. Does anyone have any recommendations?

|
EDanaII
11/18/2006 10:55:43 AM | All right, the model I chose is the Revell/Monogram B-17G. Not that I had too many to chose from, local stores only had the B-17-F, so I went to a hobby shop in the north part of town.
The model's actually quite detailed, perhaps more than I need, certainly more than the first model I built for dad. It includes more interior details, and even instructions on how to create flack damage, if I wish. It even includes instructions on how to create a diorama of a crash landing. My sister suggested I recreate the model exactly as we see in the photographs provided by Van Humbeek, but I think that's a little beyond my skills. I'd have an especially difficult time figuring out how to fracture the #3 engine mounting as we see it in the photo. Still tempting, though... 🙂
It seems the national archives does have a picture of the plane, with 1st Lt J.W.Kovach and crew in front of it, hopefully, it well tell me what type of nose art (if any) and/or lettering identified the plane. However, I've so far had trouble trying to secure a copy. one of the proxy business' that NARA use were somewhat confused about the location and nature of the picture. I'll try to get again shortly.
Now, I must start gathering a list of the other materials I need, and figure out exactly how I'm gonna start slapping this thing together. 🙂

|
Cody Dailey
11/29/2006 4:59:21 PM | Looking forward to seeing a photo pf your finished work. I hope you will post a copy to the forums when you are done. 🙂
Cody Dailey
Son of S/Sgt. JB Dailey
Tail Gunner on board Tail-End Charlie/Morning Star, aircraft number: 42-31730, piloted by George Sombart (August 1944-January 1945)
615th Squadron, 401st BG
|
Cody Dailey
11/29/2006 4:59:59 PM | I am looking forward to seeing a photo pf your finished work. I hope you will post a copy to the forums when you are done.
Good Luck!
Cody Dailey
Son of S/Sgt. JB Dailey
Tail Gunner on board Tail-End Charlie/Morning Star, aircraft number: 42-31730, piloted by George Sombart (August 1944-January 1945)
615th Squadron, 401st BG
|
Cody Dailey
11/29/2006 5:00:20 PM | I am looking forward to seeing a photo pf your finished work. I hope you will post a copy to the forums when you are done.
Good Luck!
Cody Dailey
Son of S/Sgt. JB Dailey
Tail Gunner on board Tail-End Charlie/Morning Star, aircraft number: 42-31730, piloted by George Sombart (August 1944-January 1945)
615th Squadron, 401st BG
|
EDanaII
11/30/2006 11:20:08 AM | I intend to, Cody. 🙂 I might even post reports of my progress and ask questions on how I might attack certain issues, like the nose art one.
Of all the on-line BBS' I belong to (which ain't many), if only one of them were interested in this little project of mine, I expect it would be this one.
I expect progress on this will be slow, however, since, naturally, I got a lot of other things I gotta worry about. 🙂

|
EDanaII
12/3/2006 1:32:31 PM | All right, here's my first question to the group. Hopefully, someone will have the answer, or, at least, provide a clue. 🙂
Reviewing the model this morning for the finishing materials I will need, the painting instructions for "El Lobo II" (457th BG, 748th Squad) detail that the propellor hub be painted blue. Black for the camoflauged "Chow Hound" version.
My assumption is, since the color of the hub is to be blue on El Lobo only, and blue is the color of the BG, as evidenced by the blue stripe to also be painted on its tail, I am making the assumption that my version should bear yellow on the propellor hub, rather than blue, since yellow was the color of the 401st.
Does anyone have any thoughts or suggestions on this decision? All comments welcome.

|
Paul Bellamy
12/5/2006 3:13:51 PM | Hi Ed,
The coloured propeller spinners were, as far as I can tell in this instance, just a 748BS thing.
Colour-matching fin stripes and hubs wasn't a general thing, and not at all as far as the 401st were concerned from viewing the photos, although I would be happy to be corrected if I'm in error. 😉
The spinner would usually have been semi-gloss black if painted, or bare aluminium. The actual Hub, where the blades fit, would also have been either black or bare metal. (Both can be seen in archive photos.)
Edited to add:
Looking at your photo's again, some details come to light.
There are no visible leading-edge rubber de-icer boots fitted, so paint these areas bare-metal.
In photo No1, the stbd outer engine has a bare metal hub and spinner, the inner seems to be the same, although the angle is diferent.
Hope this helps.
All the best,
Paul
Paul Bellamy

|
EDanaII
12/6/2006 10:00:16 AM | Excellent catch, Paul. Thank you.
I hadn't thought, yet, to go back and look at the original photos, since I was basically trying to figure out what materials I needed, so I'm glad you looked. 🙂
On the other issue you raised, I'm thinking, more and more, that the markings above the navigator's window might by the bomb markers representing each mission. The only argument against that position is that they appear to be drawn in an arc over the windows, rather than in a straight line. Maybe the angle of the photograph gives that appearance?
Just thinkin' out loud here. 🙂

|
Paul Bellamy
12/6/2006 8:44:32 PM | Glad to be of help Ed.
Now, this whole thing of not being able to properly work out what nose-art/name/etc. thing has been really bugging me lately.....
Add to that the many times I've built the Monogram /48th kit now has got me thinking more on the matter.....
I've discovered that in the years since I last built the kit, an awful lot of after-market detail sets have been released, and some withdrawn. But there is so much stuff out there that with a little extra work one could build an almost museum-quality model of almost any specific sub-mark of B-17G. The downside is the cost of the add-ons, and the skill required to do the extra parts justice.
I have lately put myself in the position of "If I had to build the basic Monogram kit to represent 43-38646, how would I do it?"
As a bare-metal aircraft, with over 60 missions under her belt, there would have been a lot of repairs done to both the mechanicals and the structure of the aircraft.
To properly paint plastic to look like duraluminium is at best a difficult task, factor in replaced panels and staining due to wear and tear etc. without resorting to a dozen different shades of paints, or whatever foil sheeting stuff is available nowadays (if it is still out there for this sort of thing, been over a decade since I last made the kit) would be a nightmare.
So....
personally, I'd build the kit to show the aircraft as she was when newly arrived at Deenethorpe, say.... fresh from delivery and just painted up in the Group and Squadron markings, but before any name was applied or missions flown.
It saves all the heavy weathering, and the risk of applying any inaccurate markings.
Just my thoughts, let me know what you think.
All the best,
Paul
Paul Bellamy

|
Paul Bellamy
12/7/2006 7:49:36 AM | Something I'd forgotten to check until now too.....
43-38646 was a B-17G-90-BO, but the kit represents a much earlier version. Therefore it will require a few alterations:
Waist windows:
The kit has the "barred" windows which were replaced in blocks 40-BO and 45-BO with the single-piece type.
Tail turret:
The kit has the earlier type turret, which was replaced by the Cheyenne type turret from block 80-BO, and retrofitted to earlier aircraft.
Radio Room hatch:
Although the gun mount in this hatch was still factory-fitted until block 105-BO, it was usually removed in service, the aperture being sealed with fresh perspex.
Aftermarket conversion kits are out there for most of the above, but they require varying degrees of skill to use.
The waist windows can be corrected simply by replacing them with clear sheet plastic, like a shirt collar stiffener.
Verlinden do a detail set which includes loads of stuff, including the Cheyenne turret, but is a swine to use, and you have to glaze it yourself.
This usually retails in the $40 bracket, but I did see Internet Hobbies are offering it for $31 on special offer.
Paragon Designs do a range of simple conversion sets. Their Cheyenne turret is by far the best out there, and they also provide replacement mainwheels with the correct weighted bulge at the bottom, new flaps for that parked look, a complete bomb bay etc.
The only problem is the lack of availability on the mainstream market, but eBay currently has a few combined sets at fair prices.
Highly recommended are the Squadron vac-form canopy sets No1 and 2.
These replace the cockpit, nose, astrodome, ball and dorsal turrets and the radio room hatch. Last I looked these were under $3 each.
A great source for more info is at http://www.swannysmodels.com/B17G.html.
All the best,
Paul
Paul Bellamy

|
EDanaII
12/7/2006 12:07:20 PM | Damn, Paul, you've been busy! 🙂 Not that I mind, not at all.
But, I need to correct you. The serial number in question is 42-102659 which this site lists as a B-17G-55-BO. I don't know if that affects your suggestions or not.
The serial you are refering to is the number of the one unnamed plane my father served on. I thought it best to list the serial rather than to just call it "Unnamed."
As to your other suggestions: the main goal of this project is to make dad feel better about himself. Life has been rather rough on him these last two years since the death of his wife of 56 years, and our mother. Since that day, one day after his birthday, dad has been deeply depressed and blames himself for the accident that the law did rule him responsible for.
So, while I do want to be as accurate as possible, my main purpose is to pay tribute to dad for his service during the war.
I like your suggestion about detailing the plane as it might have appeared just before it was named, but I think that I'm better served to detail it as it might have appeared on its last mission. Would I like to do that with the level of detail you are suggesting? Absolutely! 🙂 But that is a little beyond my skills, so, instead, I think I'll put the appropriate amount of mission markers (or whatever they were called), place the name on the plane, if there was one, and leave it looking shiny factory new. I feel that this should be enough for my purposes.
If, however, I can do the detail you suggest, I certainly wouldn't mind it at all. In fact, I wouldn't mind taking my sister's suggestion and recreating it just exactly as we see it in the photos. But, I know for a fact that this is beyond my skill set, so I think a shiny untouched aluminum hide will be just fine. 🙂
I'm going to make the assumption that, since the 401st web site lists the Hard Seventeen as a 55-BO, that all the changes you identifed that apply to anything less than the 55-BO are the ones I should look into, and anything greater I should ignore. Let me know if I'm right/wrong in that assumption.
Monday, I'll try and get that picture of the Hard Seventeen with Kovach and Crew from NARA again. What worry's me, though, is that there's already a picture of Kovach & Crew on this site, but it shows a camoflauged B17-F (I think) named Good Pickins, so I'm not sure who's mistaken: this site, NARA or me. I guess I'll find out soon enough.
Appreciated, as always.

|
Paul Bellamy
12/7/2006 3:30:36 PM | Oops!
Looks like I got distracted at some point.. I was wondering why the "transferred from 447BG" thing had gone....
Anyhow, modelling a 55-BO from the Monogram 35-BO is the simplest of the jobs, just the waist windows to replace.
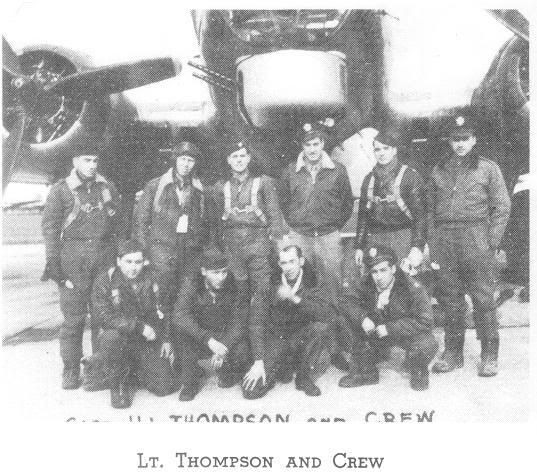
I found this photo in the Blue Book, I don't know whether it's the right Lt Thompson though.
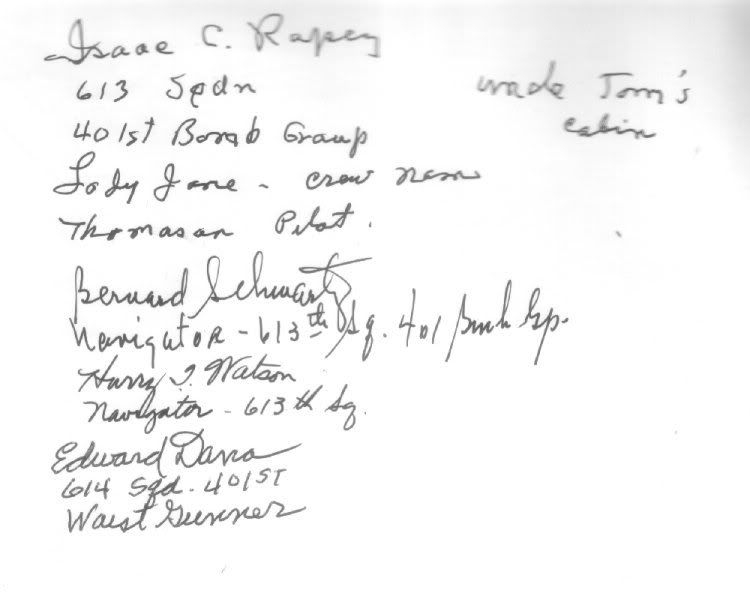
And I also remembered this was on the inside back cover after a reunion at Deenethorpe quite a few years back... you may recognise something... 🙂
All the best,
Paul
Paul Bellamy

|
EDanaII
12/9/2006 2:00:33 PM | Yea, I'd know those scratchings anywhere. 🙂
I'm guessing that you're the one that provided the jeeps for the Deenethorpe reunions. I don't remember if I ever met you formally, Paul, but I do remember the jeeps from various trips.
As to the photo, I don't believe that is the crew that dad belonged to. He's certainly not among the men I see there. We do have a photo of him and his fellows, but it's taken in front of the woods near the base. One of these days, I should include with in my on-line pics of the Hard Seventeen.

|
EDanaII
3/31/2007 9:57:14 AM | OK, so, finally I get some time to resume this little project of mine. 🙂 I've spent the last few days painting all sorts of parts in preparation for slapping things together. I can't tell you how much fun it is trying to paint the top turrets aluminum frame without messing up... actually, I didn't mess it up (too badly) but I did have a devil of a time trying to paint the nose.
Anyway, I'm still stuck on trying to get the image of the plane out of NARA. I contacted an agency that does photo reproductions for NARA only to have them tell me, effectively, "I don't know what you're talking about." Sigh... Anyway, Paul Bellamy has been gracious enough to help me figure this out. If anyone else has clues, please feel free to jump in. 🙂
Paul, this is all the info I have, right here. When I presented it to the reproduction service, they told me "they don't do videos" to which I had to explain, "it ain't a video, it's a jpg." Anyway, I didn't manage to get the photo. If you can help me get it figured out, as I mentioned before, I'd be grateful.

Unfortunately, I suspect the photo in question is actually this one. Which I'm pretty sure isn't the Hard Seventeen. Of course, there's only one way to find out, and that's to get that bloody photo. 🙂

With less than 6 weeks to go before the trip, I better get my tucus moving.

|
EDanaII
3/31/2007 12:27:44 PM | Just to follow up... After doing some research, it looks like, to get my model looking like it's original, I'm gonna paint the tail stripe by hand, use these decals for the serial numbers, and use ink jet decal paper to create the white on black S. That last bit might be a bit tricky as ink jets don't print white. I'll probably need to paint underneath before I apply the decals.
I'm still not sure what to do for nose-art (gotta get that photo!) or where to place the mission markers, but... one dilemma at a time. 🙂

|
Paul Bellamy
3/31/2007 6:10:49 PM | Ed,
Looking at the request form you posted, I think you're in luck!
The important bit is the Negative Number, in this case A65425AC ( originally A-65425A.C.) which IS of Hard Seventeen, and is on the main 401BG website as 65425A. And it shows the nose art at 25 missions too.

All the best,
Paul
Paul Bellamy

|
EDanaII
3/31/2007 9:11:45 PM | Dude! You are AWESOME! 😃
When we get to England next month, I owe you (at least) a pint. 🙂 Of course, I don't drink, and we might have trouble meeting up, but I definitely owe you something, man! If only my first born child. 😉
Of course, now it looks like I really got my work cut out for me. 🙂 Recreating all that is definitely gonna be a challenge. First problem for me is, in fact, the nose art. Is that a King (Jack?) and an Ace? For a plane named "Hard Seventeen" I would expect that it was a King and a Seven, but it doesn't look like a seven to me. I definitely have to show this pic to dad and see if it jars his memory. Gotta be careful though... I don't want to "show my hand." 😉
And, of course, this only generates more questions for me... definitely olive on the engine mounts and in front of the cockpit, but, is it me, or does the OD extend around the navigator's blister and the cheek gun too? Looks like the propeller hub is in fact aluminum, just as you suggested, but it looks like only the top half, not the rest that attaches to the propeller shafts. Unfortunately, I've already painted those pieces and including the shaft attachment.
The mission markers seen here are twenty five, but the Hard Seventeen went down on it's 52nd mission. I'm assuming, then, that these would wrap at twenty five, so that I need to create 3 rows of markers: two at twenty five each, and a third row with only one single marker.
I also notice writing between the markers and the navigator's windows. Correct me if I'm wrong, but I'm assuming these are the names of the crew that manned the nose. Would they have changed when the plane was assigned a new crew? I would assume so. I assume, also, that the names printed on the plane were of the officers, I don't believe they printed the enlisted men's name. Someone correct me if I'm wrong there too.
Finally, would all this be symmetrical? Would the mission markers and nose art have appeared on both sides of the plane? This is a bit problematic as the right cheek gun is set back a bit from the nose. Looking at both the original and "cleaned up" photos, there is a patch that is slightly darker than the rest of the skin that does appear to be where the right cheek gun would be. Once again, I may have to carefully prod dad for info.
Thoughts?

|
Paul Bellamy
4/1/2007 8:24:08 AM | "EDanaII":
Is that a King (Jack?) and an Ace? For a plane named "Hard Seventeen" I would expect that it was a King and a Seven, but it doesn't look like a seven to me. I definitely have to show this pic to dad and see if it jars his memory. Gotta be careful though... I don't want to "show my hand." ;)
Good luck with that. 😉
does the OD extend around the navigator's blister and the cheek gun too?
On Boeing-built bare metal Forts the OD anti-dazzle panel on the nose does go around the front of the astrodome. The cheek gun panel is a bare metal casting, so the colour difference is just due to the slight difference in metal tone.
Looks like the propeller hub is in fact aluminum, just as you suggested, but it looks like only the top half, not the rest that attaches to the propeller shafts. Unfortunately, I've already painted those pieces and including the shaft attachment.
I also notice writing between the markers and the navigator's windows. Correct me if I'm wrong, but I'm assuming these are the names of the crew that manned the nose. Would they have changed when the plane was assigned a new crew? I would assume so. I assume, also, that the names printed on the plane were of the officers, I don't believe they printed the enlisted men's name. Someone correct me if I'm wrong there too.
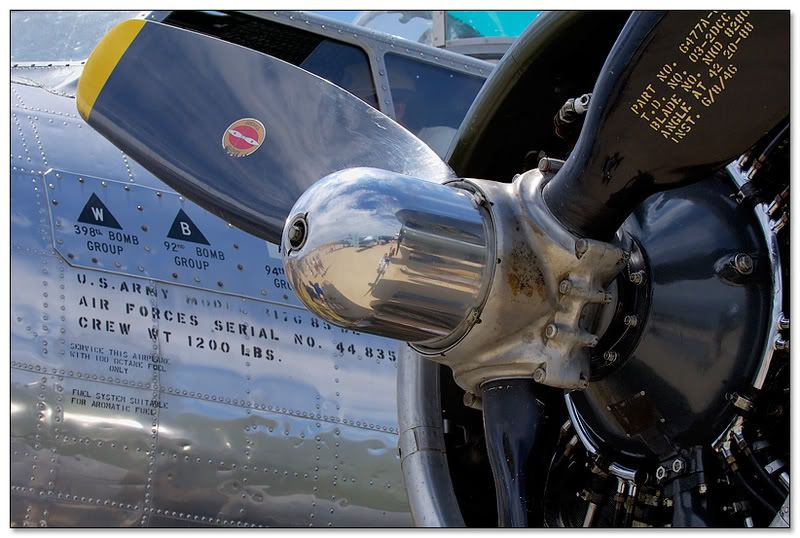
This photo should help with details of the prop hub, engine wiring and shows what the stencilling below the windows was. (The USAAF aircraft details stencil showing the aircraft type/block/manufacturer/serial number/crew weight/fuel octane rating etc.) There is one on the standard Monogram decal sheet that's ok to use, as the numbers are too small to be seen to be from a different B-17G.
Ignore the group markings on the cable access panel above the stencil, and the polished spinner, this is of a display B-17.
Finally, would all this be symmetrical? Would the mission markers and nose art have appeared on both sides of the plane? This is a bit problematic as the right cheek gun is set back a bit from the nose. Looking at both the original and "cleaned up" photos, there is a patch that is slightly darker than the rest of the skin that does appear to be where the right cheek gun would be.
I would think the nose art would only be on the port side, they usually were. The dark panel for the right cheek gun is, once again, simply due to the different colour of the casting to the skinning.
The mission markers seen here are twenty five, but the Hard Seventeen went down on it's 52nd mission. I'm assuming, then, that these would wrap at twenty five, so that I need to create 3 rows of markers: two at twenty five each, and a third row with only one single marker.Thoughts?
Looking at the NARA photo, and those on your own site, I think the mission markers were all in one line. There's certainly just a single line on your photo Hard1703.jpg
I've found this font for you, seeing as you have access to printing your own decals. It might make things easier.
http://www.dafont.com/font.php?file=usaaf_stencil
I would suggest masking up and painting the triangles in white first, making the S up from masking tape and overspraying the triangle (and the stripe edgings) in black. It's a lot easier that way. 😉
I'll have a look through my font books, I might find a match for the one used for the HARD SEVENTEEN.
Hope that helps,
Paul
Paul Bellamy

|
EDanaII
4/1/2007 10:01:58 AM | On Boeing-built bare metal Forts the OD anti-dazzle panel on the nose does go around the front of the astrodome.
You're right, of course. I went back after I posted and took a closer look. Definitely goes around the dome.
The cheek gun panel is a bare metal casting, so the colour difference is just due to the slight difference in metal tone.
Here, unfortunately, I'm forced to disagree. The entire plane is bare metal, so I'm not sure what could account for the differences in tone between the cheek and the rest of the plane but paint. Maybe not OD, but it sure looks like there's some color other than bare metal aluminum there. Could be wrong, though... gotta take this one to dad too.
I would think the nose art would only be on the port side, they usually were. The dark panel for the right cheek gun is, once again, simply due to the different colour of the casting to the skinning.
I think you're right here too. It's just that I've seen some planes with markings on both sides, so it was necessary to ask the question. However, the photos don't seem to suggest otherwise.
Looking at the NARA photo, and those on your own site, I think the mission markers were all in one line. There's certainly just a single line on your photo Hard1703.jpg
That's not so clear to me, I don't see that on my photo. However, I'll defer to your expertise here. 🙂 Although I may try jogging dad's memory there too...
I've found this font for you, seeing as you have access to printing your own decals. It might make things easier.
Those fonts are definitely helpful, again thanks. 🙂
I'll have a look through my font books, I might find a match for the one used for the HARD SEVENTEEN.
Worst case scenario, I can lift the words from the image, itself, and flatten and stretch them until I have a useful mask. But if you can find a corresponding font, that'd be fantastic. I'll be doing some searching myself, but I've definitely gone from owing you a pint to owing you a gallon. 🙂

|
Paul Bellamy
4/1/2007 10:46:24 AM | Here, unfortunately, I'm forced to disagree. The entire plane is bare metal, so I'm not sure what could account for the differences in tone between the cheek and the rest of the plane but paint. Maybe not OD, but it sure looks like there's some color other than bare metal aluminum there. Could be wrong, though... gotta take this one to dad too.
I'll stick this photo of some bits I found at Deenethorpe on to show what I meant.

The centre piece is stainless steel panelling from an engine cowling, the piece on the right is where one of the 50 cal barrels sticks out of the ball turret.
It's painted grey, but where the paint has come off you can see the dull grey/silver colour of the cast alloy.
I think this is the same alloy used to cast the cheek mounts and would show up as a darker tone on a black & white photo. Most restored B-17s have these cast parts sanded and polished to match the duraluminium sheet skinning. It could even be as simple as the dural sheet being laid in a different direction.
I'll try to get some better photos of other parts for colour matching, but here's another example.

All the best,
Paul
Paul Bellamy

|
EDanaII
4/2/2007 12:47:32 PM | Your picture of the Witch convinces me that I'm wrong. I assume this would happen when repairs where made on the plane. Maybe the solution, other than leaving the cheeks untouched, is to paint them silver? Perhaps not the most accurate solution, but it would help account for differences on the cheeks.
For the nose art, I'm going to use (something like) this image: 
It's not an exact match, but for my purposes, it will do. Especially considering that dad still doesn't remember the details. And since (I believe) there's no one around to contradict me. 😉 While I'm still not 100% certain the second card is an Ace or a Spade, I think this image best represents what was on the plane.
So, Paul? Do you think the actual negative in the archives would be of a better resolution than the image you found on the 401st site? It might get me a better idea of what those cards are.

|
EDanaII
4/2/2007 6:19:15 PM | I think I've found my font:

Not a 100% match, but pretty damn close and with a couple of tweaks (lower the middle bars on the E, thicken the A, N and V) and I'm 99% there.

|
EDanaII
4/3/2007 11:21:28 AM | Since I have ink jet decal paper on the way, I decided to scan the original decal set for El Lobo II and make modifications.

The black triangles have been modified to contain the 401st S. I added the serial numbers for the tail of the Hard Seventeen, as well as, the Blackjack hand and the name. Not sure if I got the last two the right size, I'll probably have to do some test-fitting before I place the decals. I also assumed the name was in red, to match the color of the Jack of Diamonds, but this could be another of my many wrong assumptions. 🙂
I'm bothered by the stars that come with the original decal set. Shouldn't they be wrapped in blue? I don't like their bomb-markers either. I may have to create my own.

|
Paul Bellamy
4/3/2007 1:43:21 PM | Coming along well Ed,
Being hand-painted originally, the name is a mix of serif and sans-serif letters.
The closest I can match from standard fonts is Lucida Sans with any required serifs added by hand. The H and the Ns in Lucida Sans Unicode give the correct uprights, but the H needs inverting I think.
They are both in the standard Windows font set, see what you think to them.
The blue surround for the Star and Bars insignia was, oddly enough, Insignia Blue.
FS 595b code: 15044(glossy)
Which in RGB is R:38 G:48 B:66 or Hex:263042 to help with making your own decals.
You can delete all the "crew names" decals from the sheet, they were specific to Chow Hound.
Also, the black walkways on the wings can be ignored, they weren't common.
The anti-dazzle panels on the outer nacelles should go straight down the top centreline, not extending out over the oval panels as shown on the Monogram instructions for El Lobo.
While I remember, remove the flash hiders from the chin turret gun barrels, and the rudimentary "wind-deflectors" moulded in front of the waist windows and radio room hatch, this improves the lines of the kit no end. 😉
I've got a drawing showing the various common shades of bare metal around a standard B-17G, I'll see if I can find it for you. Remember the control surfaces were fabric-covered, painted in silver dope.
In the meantime, here's a nice big photo of a factory-fresh Fort shgowing the shiny, really shiny and not so shiny areas. 😃
http://www.nationalmuseum.af.mil/shared/media/photodb/photos/060517-F-1234S-024.jpg
(Linked as it's a BIG photo.)
And another one in colour too, not so factory-fresh this time.
http://www.nationalmuseum.af.mil/shared/media/photodb/photos/060517-F-1234S-029.jpg
All the best,
Paul
Paul Bellamy

|
EDanaII
4/4/2007 9:36:31 AM | Actually, I'm considering placing the names of the R.B Thompson crew on the plane, including a certain S/SGT E.G.Dana. This might not be historically accurate, but, then, historocity was never my exact intention. 🙂
Some more questions: Silver dope? Is that a special kind of silver paint? "Flash hiders?" "Wind-deflectors?" I'm afraid I don't know what these are. What would the colors for the mission markers be? I'm assuming yellow on olive drab.
As always, thanks for your help. It has been invaluable. I think we're up to a keg, now. 🙂

|
EDanaII
4/5/2007 11:00:50 AM | OK, I'm thrilled. Yesterday, I managed to get the ball turret painted without screwing it up. There's hope for me yet. The last time I did it, I messed up so badly that I ended up painting everything except the center window just to cover for my goofs. Next, I've got to paint those radial engines.

|
Paul Bellamy
4/5/2007 7:51:57 PM | Great stuff Ed!
That ball turret is a swine to get right, especially from the kit instructions.
I've found my set of instructions for the kit, I hope they are the same as the ones you have.
The "flash hiders" I refered to are the "blast tubes" mentioned on the first page, step 4, part number 45. (the pointy bits on the end of the gun barrels)
The "wind deflectors" are the ridges moulded in front of the two waist windows, and in between the large and small radio room windows on the kit.
If I can find my part-built kit before you get over here I'll try to make up the proper waist windows for you to take back with you.
EDIT:
It seems there are two sets of moulds for the Monogram/Revell kit, one of which has a fault with the engines.
The faulty mould causes two of the engines to fit upside down.
Give me a while to get some accurate photo's to check which way up the engines should be before you fit them. 😉 ( I can't lay my hands on my engineering drawings at the moment either.)
All the best,
Paul
Paul Bellamy

|
EDanaII
4/5/2007 10:12:33 PM | Yea, add to my troubles, I fit the ball turret together, but it's not a perfect fit. Looks like I'm gonna have to use some putty and repaint.
The blast tubes I can definitely fix. I assume I should remove them just where the piece thickens. As to the deflectors, that's definitely beyond my skills. I'm afraid I'd screw the fuselage up if I attempted to remove those.
And the waist windows? That would be fantastic if you could, but I have (yet another) dillema here. 🙂 The plan is to finish the plane within the next week or so. Then it's gonna be packed up and sent off to Grimbergen where it will be presented to dad when we arrive.
What I'm considering doing with those windows is simply not to paint the ones that came with the kit. An imperfect solution, I know, but definitely within my abilities. 😉
I didn't paint the engines today, instead I painted more detailed pieces. I got stalled on how to paint the engines, the instructions were unclear, me not knowing the difference between some of the parts they named. Instead, I'm going to paint them according to this pic:

Still have some more details to complete, and then I'll be ready to mask sections off and start painting the fuselage.
BTW, what color should those mission markers be? Is my assumption of Yellow on OD correct?

|
Paul Bellamy
4/6/2007 9:25:05 AM | Hi Ed,
Here's part 45 (Chin Turret Guns). Remove the red bits.
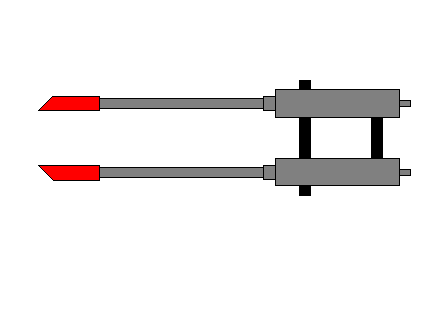
I've traced and measured the size for the waist windows.
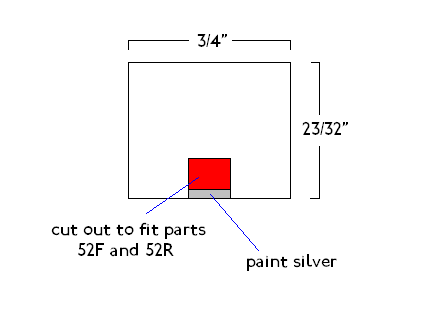
Any thin clear sheet plastic will do for making these, glue into place with white craft glue to prevent fogging. This will also fix the guns and their mounts into place securely and fill any gaps. The barrels should point towards the rear of the fuselage.
There are plenty of reference photos in the Crews section of the NA Gallery.
Here's a good colour reference for both painting and fitting the engines.
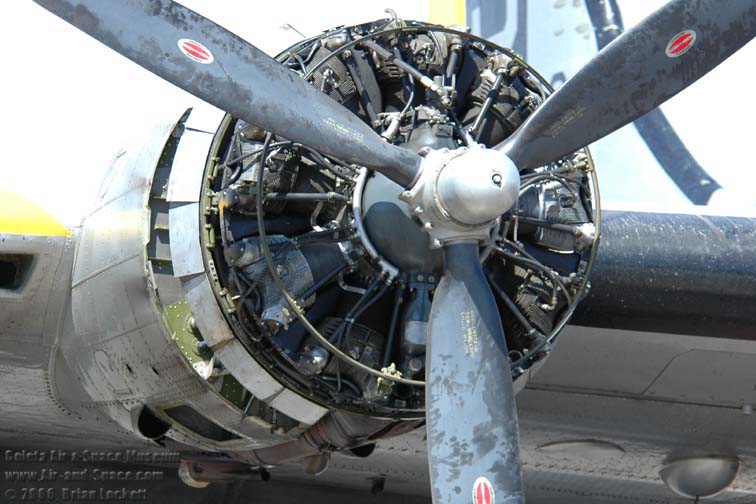
This confirms the engines fit with the "spur" on the upper side of the domed crankcase. If you have a kit with the dodgy mould, just file a flat on the top side of the peg the engines fit onto, to match the one underneath.
Bomb markers seem to be yellow on a black stripe.
Silver Dope is just a silver coloured paint for fabric, used on the rudder, elevators and ailerons.
If you add a drop of white to your regular aluminium paint to lighten it a bit, that will be about right. Use this same mix for the dinghy compartment doors. (the two panels with moulded hinges along the lower edges on top of the fuselage over the bomb bay).
Fuselage and wings gloss aluminium overall, add a drop of black to the mix for the cheek gun mountings.
Engine cowlings and the first bit of the nacelles (back to where the ring of grooves is moulded) in silver, same for the centre part of the tail fin. (between the thick ridge and the rudder, down to the line of screw heads at the bottom.)
This is because the cowlings etc. were stainless steel, and I think the main fin section was a different grade of aluminium to the rest of the skin.
I think that about covers the paint shades... 😉
Anything else, you can use MSM to get hold of me most of the time via paulbellamy1939 AT hotmail DOT com.
All the best,
Paul
Paul Bellamy

|
EDanaII
4/6/2007 7:53:47 PM | Excellent, as always, thank you, Paul. 🙂
I'll attempt the window, I think I can do that, but... well, you know. 😉 If I can't do it then my fall-back plan is still to use the original windows unpainted.
Anyway, didn't work on the engines again today, instead I decide to finish the cockpit interior:


Still needs some work and touch up, but I am making progress.
I may have to set it aside for a couple of days while I get some other things done. Stupid priorities!

|
EDanaII
4/11/2007 3:03:56 PM | All right, I painted the wings and fuselage with an aluminum metalizer laquer. It's been a while and the parts are dry and I've even done a little buffing on them but my fingers still turn silver if I handle the parts. Is this supposed to happen? Do I need to apply a gloss finish on them? I was saving the gloss finish for when I was uh... finished. Never used a metalizer before, so I could be going about this wrong.
Also, the parts have discolorations in the plastic that still show up after I painted them. Do I need to apply another coat? The current coat seems good enough.
I realized today that the company that I ordered the ink jet decal paper from has white sheets too. I should have seen those sooner. They should make applying the blackjack so much easier.

|
Paul Bellamy
4/12/2007 8:26:40 AM | Hi Ed,
I haven't used any of the metaliser paints since they were still new, but I always had the silver-finger problem, streaking and transparency too.
I had a quick look through some modelling forums the other day and it seems the current thing to do is paint the model black first, then apply the metaliser... and presumably seal it at the end.
Sometimes the metaliser doesn't seem to go off properly either.
I'm trying an experiment on a spare monogram fort wing at the moment, skinning it with regular household tinfoil. It'll look a bit rough as it's already painted with dust flecks in the old paint, but I'll see how easy/hard it is and how things go.
All the best,
Paul
Paul Bellamy

|
EDanaII
4/12/2007 11:16:46 AM | While the transparency is annoying, it's tolerable. I suppose a second coat won't hurt, so maybe I'll repaint tomorrow. I guess I'll live with the fingertips until I apply the gloss finish.

|
Paul Bellamy
4/12/2007 1:24:43 PM | First attempt at foiling in over a decade.
Not the best results, but it is over a badly hand-painted surface, and I'm still experimenting with the glue mix.


Ignore the creases, I forgot to properly smooth the foil before laying it on. (and the cat stood on it too.) 🙂
The brush marks still show through, but I've yet to wash it down and burnish it off with fine wire wool.
Paul
Paul Bellamy

|
EDanaII
4/12/2007 7:06:42 PM | I suspect that skinning it that way, once again, would be a little beyond my what both my skills and patience would allow. 🙂
I have a can of gray enamel spray. I'm thinking I can use that as a primer coat, and then repaint the plane aluminum. I'm hoping that this won't lay the paint too thickly on the plane. Worst case, I purchase another kit and repaint only the parts I need.

|
Paul Bellamy
4/12/2007 7:43:11 PM | Hi Ed,
I did the foiling thing as a personal experiment..... just to see if I could. My previous attempts many moons ago were an expensive faliure, this time they weren't so bad.
However, the few bits I did today took a few hours on and off, I'd expect the whole kit to take a good fortnight of afternoons to do at least, if I had better glue and more flexible foil.
Without knowing exactly which brand of paint you've used on your model I can't give you a safe answer right away. I don't know whether you've used enamels, acrylics or one of these new things, so I await your response. 😉
At the very least I would suggest that before you do any more, you wash it all over with warm soapy water with a 1/2" brush and dry it off with some kitchen tissue.
That will most likely remove anything that is likely to come off at some point immediately, and give you a better idea of what you have to work with. Using a brush means you can prevent any of the loose pigment getting where it shouldn't get onto.
Let me know what we've got to work with and I'll see what I can recommend, especially as time is ticking now. 😉
All the best,
Paul
Paul Bellamy

|
EDanaII
4/12/2007 11:04:20 PM | Yea, I was hoping to finish by this weekend, but it looks like it'll be a wee bit longer. No problem, really, since I'm still waiting on those white decal sheets.
As to paints, I painted the plane with a Model Master metalizer lacquer, aluminum plate (1451). The gray enamel I'm considering using as a primer is (I think) a Testor's gray enamel (1238). I'm thinking about priming everything but the control surfaces. I may paint those white, or leave them alone. Since the metalizer goes on partially transparent, I'm thinking that should be equivalent to the drop of white in the aluminum you were suggesting. I may paint the cheek panels darker for the same reason.
Good advice about the soap and brush. I was worrying about all the loose aluminum affecting the the new coat. My debt is growing. 🙂
BTW, did you get the private email I sent? I only ask because, lately, I've had a problem with emails vanishing into the ether. I've had a devil of a time lately communicating with Van Humbeek for this reason. It's been kinda frustrating.

|
Paul Bellamy
4/13/2007 11:06:41 AM | Hi Ed,
I've gone through Testor's website, and a fair few user reviews...
I think going with the grey primer overall and white control surfaces should be fine.
The common advice on using the spraycan Testors is do a number of thin coats until you get the right depth of colour, wait until dry, buff with an old t-shirt then go over it all with the Testors metalizer sealer, No.1459 on their list. Plenty of thin coats once again, to blend everything together That should stop any future silver-finger trouble. 😉
I'll add a quote from one of the modelling forums on this:
"I can't tell you too much about what to do with metalizer, but I can tell you what NOT to do. I've never used SnJ, but I want to. I can't find it locally.
Don't put metallizer on without polishing the plastic to a mirror like perfect finish. Every blemish WILL show.
Don't put a little on. Get it with several thin coats, then polish it about 20 minutes later.
Be gentle with it. It is fragile.
Polish it until it looks really like shiny aluminum foil.
Be gentle with it. It is fragile.
Use all sorts of things to polish it. Toothpicks, Q-Tips, artists' pastel supplies, whatever you can find. Experiment a LOT.
Don't use Testors' low-tack masking EVEN ON TOP OF THE SEALER. The finish is too fragile. Use wet tissue paper cut into pieces.
Be gentle with it. It is fragile.
Don't seal it with gloss lacquer, as it will attack the finish and make it look like a fine silver paint. Use a LIGHT coat of metalizer sealer or Future.
Be gentle with it. It is fragile.
Be gentle with it. It is fragile.
Be gentle with it. It is fragile.
Make sure you are gentle with it. It is fragile. I think that sums up my experience with the Testors Metalizer. "
The other thing, even Testors say this, is paint the metallizer LAST. It won't stand up to any masking even after being sealed, so prime and paint the yellow tail stripes, anti-dazzle panels etc first, then mask them out.
Once you've put the sealer on and it's dry, apply the decals and put on another coat of sealer to finish it all off.
Your e-mail came through just fine, I'll reply after the weekend when I get my work dates for May.
(I'm off playing with the RAF's flying Avro Lancaster and C-47 this weekend, such hardships! 😉 )
All the best,
Paul
Paul Bellamy

|
EDanaII
4/13/2007 11:53:57 AM | OK, so... what if I had painted the plane silver, instead of aluminum? How big a difference is that? I have can of Tamiya Color for Aircraft "Bare Metal Silver" (AS-12) that I was told would be less of a hassle to finish. I only went with the aluminum assuming it would be more authentic. (So many lessons, so little time.)
Just curious...

|
EDanaII
4/16/2007 4:53:14 PM | OK, now I'm worried. It seems the metalizer is interfering with the primer and other paints I've placed on the plane. I painted the cheeks black, and then masked them so I could paint the anti-glare patches for the cockpit, only to have some of the black come off after I removed the masks.
I may have to go with my worst case scenario and buy a second plane. I don't mind so much, except for the fact that I'm getting short on time. I still need to ship the plane to Grimbergen, and that's definitely gonna take some time to get there.

|
Paul Bellamy
4/18/2007 7:17:45 AM | Just to check, you primed and repainted over your first attempt with the metalizer?
If so, it's fairly certain some lifting will occur after masking if you use tape or similar.
Dampened tissue paper can be used for low-tack masking in this case, or you can touch-in by hand if needed.
Best of luck,
Paul
(PS, if the weather is fine I've got hold of a jeep and driver for your Dad's visit to the airfield.)
Paul Bellamy

|
EDanaII
4/18/2007 10:50:06 AM | Yes, I primed the plane -- like I should have done in the first place -- over the metalizer. I'm using special tape for masking models. It's not as bad as I feared, and where I have painted, it appears to be staying on, I'm just concerned that, after all is said and done, pieces will continue to flake off.
The plane is painted and masked off. I'll apply metalizer again today and... cross your fingers.
You're arranging a jeep? Kewl! 🙂 But, unfortunately, our schedule is tight. We've only got a day and a half for your region, with one whole day spent in Knottingham. I wanted to make it two and half days for that area, but every one else wanted to spend more time in London. Stupid London! I just don't see what the big deal is. 🙂

|
EDanaII
4/18/2007 11:09:25 PM | Metalizer went on fine. I think it's going to be OK. Biggest problem now are the tail stripe and AG patches. I've left the masks on to keep my fingers from silvering them from the metalizer. According to instructions, I shouldn't apply the metalizer finisher until after I've applied decals. The wings are assembled. I guess I'll see how much I can do with the fuselage tomorrow.

|
EDanaII
4/24/2007 1:40:06 PM | Yippee! The sites back up! 🙂
And Yippee! I'm finished with the Hard Seventeen! (Well, OK, I have a couple minor things yet to do, but I've got enough to present to the forum).
Here's the original photo that Paul was good enough to locate for me:

And here's a comparison shot of my completed model:

Getting the name arched like that, btw, was not easy. Took lots of time and patience. 🙂
More pics here: My Albums Page.

|
Phoenix
4/29/2007 3:23:28 AM | Ed
Love the model, good on yer, I have followed the progress of the subject from the beginning and it has been fascinating. I model in 1/72 as my wife would go mad if I made something as large as 1/48 and I have been wanting to do a 401st aircraft for some time but the lack of available decals has discouraged me. However your efforts have given me the inspiration to get going so well done to you, great effort.
All the best
Dale
improvise, adapt, overcome
|
EDanaII
4/30/2007 1:09:41 PM | Thanks Dale, I appreciate that.
I probably should have done it 1/78 scale, but... what the hell. 🙂
OK, since you seem interested in doing similar, I'll talk about some of my experiences on this little project.
I mentioned this privately to Paul, painting the control surfaces white and the cheek black didn't do any good. It seems the metalizer is _texture_ transparent, not color transparent. If I had this to do over again, I would have only applied the primer only to the aluminum surfaces. This would have covered over the blemishes where I didn't need them and allowed the texturing on all the flight surfaces to show through better.
That said, when I went to the hobby store, they recommended I use that Tamiya silver paint. Told me it was less hassle. Unfortunately, I brain-farted and forgot about that. I did apply the Tamiya to the engine covers and if you look closely, you'll find that they're slightly bluer than the rest of the plane, but it did appear to go on with out the silvering of fingers, so it may very well have been less hassle than the metalizer.
I'm not happy with the monogram kit. Despite the extra details, some parts were poor fits. Several of the windows did not go in right and some were even a millimeter or two smaller than the surface they fit into. I'm sure an expert could of overcome some of these difficulties, but I hadn't the time, the experience or the patience.
The ink jet decal sheets were very helpful, but they adhered rather strongly to the plane. It was more difficult to position them than it was the original decals that came with the kit. The white ink jet decals where semi-translucent, when I positioned the triangle S over the tail stripe the black and yellow showed through, if only slightly. For those who have the time and patience, I'd recommend using the transparent decal sheets and painting a white triangle for them to go on. And, while hard to see, the transparent decals cracked, ever so slightly, after being applied, leaving tiny silver veins running through the decal. Barely noticeable, but present, nonetheless.
Hope that helps. 🙂

|
Phoenix
4/30/2007 2:21:40 PM | Ed,
Wow some great technical stuff there, the silver paint and decal sheet info will prove invaluable I like Tamiya paints but hate silver I find it a real pain but I have never tried the Tamiya product so maybe this time I'll give it a go. I think I understand what you say about Revell/Monogram I recently built the Revell 17F in 1/72 and it was garbage. For my 401st projects I have two Hasegewa 17G's and the moulding and detail appears far superior, just got to pick two aircraft now, probably 'Mary Alice' and one other. Anyway thanks for the hints they will be a great help.
All the best
Dale
improvise, adapt, overcome
|
EDanaII
5/3/2007 10:42:28 AM | You're welcome, Dale. I like to think I'm good fer sumthin, so let's just add that one to the list. 😉
Of course, if you have any specific questions regarding my experience, feel free to ask them. I'll probably turn around and just ask Paul. 😉
Six more days and then we're on our way...

|
EDanaII
5/19/2007 12:23:39 PM | Well, I just got back from my trip to Belgium yesterday and all I can say is... "Wow!"
More than twice the number of people expected (50 instead of 20); non-stop "thank you's" from everyone, including us; newspaper, radio and television coverage; representatives from the Belgian air force and the American embassy present.
And, after all was said and done, people that had watched the news coverage from the night before thanked dad before and after we boarded our return flight home, including the pilot.
So, like I said... "Wow!" Who would have thought someone deserved so much attention for simply crash landing in a field some 62 years ago.
I'll post pictures if anyone is interested, once I get them all together.
Ed.

|
EDanaII
5/20/2007 1:28:14 PM | BTW, here's a little summary of our trip:
First we got a tour of the Grimbergen Abbey, famous for their local beer. Impressive place. Then Frans took us to the crash site where dad was interviewed by local radio. Next, we were taken to the airfield in army and navy jeeps where the Hard Seventeen was attempting to land, and dad, myself and my nephew were put into a piper cup and flown over the crash site. Newspaper photographers with us every step of the way. Then we were escorted to the Grimbergen town hall, where the mayor spoke and then I spoke and then dad received, as a gift, a piece of the aircraft (a flight suit heater) and allowed to sign a piece of armor plating from the plane. Belgian TV was there, asking dad all sorts of questions. We then mixed it up, talking with a three star general from the Belgian airforce and his associate, three American embassy officials and a number of locals who were present at the crash. One of particular interest to me, was a man who, in his youth, had taken pieces of the plane's plexi-glass windows and made them into jewelry. Sadly, he had sold them all and had none to share with us at that time.
From there, we were taken to a rather unique (and small) Belgian museum called Broken Wings that held wreckage from a number of craft from WWII, including a piece of a B-17's waist, dad's old position. Many pictures were taken.
But that was not all. On the day of our departure, as we were checking in, the head of American Airline's "Superior Services" greeted us and thanked dad for his service. He even had the words "Welcome Ed Dana Group" placed on the airport monitors for all to see. We were all let onto the plane early and greeted by both attendants and pilots alike.
A very special trip. I doubt that I will ever experience anything like it ever again.

|
EDanaII
5/24/2007 10:08:28 PM | All right, for those who are interested, no pictures to post yet, but on my Albums Page. I added four new images at the end of the list. They are the images of the Invitation and three newspaper articles concerning the trip. All are in Flemish, translation are provided. The translations are a work in progress.
Let me know if you have any issues access the site, some people do and some don't. Not sure why, but any clues are welcome.

|
Paul Bellamy
5/25/2007 5:49:40 AM | Good stuff Ed,
Glad you had a good trip, and hope the model turns up sometime.
All the best,
Paul
Paul Bellamy

|
EDanaII
5/25/2007 2:40:11 PM | Thanks, Paul, on both counts.
And, sorry I missed you in Corby. Things really were hectic.
Which reminds me, I guess I should mention to the others here that my model, shipped by USPS never showed up in Grimbergen. 😞 For all I know, it's sitting in some government warehouse somewhere next to the Arc of the Covenant.
I may try building the model again and correct all the mistakes I made...

|
EDanaII
6/1/2007 4:52:29 PM | All right, for the voyeurs out there, I've updated my Vacation's Page.
Few explanations are provided, I'm still working on those.

|
EDanaII
7/26/2007 9:27:41 PM | In case anybody is still interested, I finally received the Belgium news report of our trip. Here's the Ring TV's (Belgium) Television coverage of our trip. It's modest, but it's still 2 minutes more fame for my father.
Enjoy.

|
swinny
9/8/2007 5:29:12 PM | Hello Ed
this is a very interesting article you wrote.
I am also trying to build a B-17G because i adopted the graves of 2 airmen who flew with the Maid to order.
The model i am building is from Academy 1:72
But i got stuck on the decals, that is a problem for me.
I cant find any decals from the 401st, and i wrote to a lot of people about it but now one could help me.
Is there any possibility that you could help me with that, i would be very pleased.
The plane will be a memorial for the men.
Thank you , Andy
_______
 My adoption graves http://www.remember-our-heroes.nl/us_401stBG.htm My adoption graves http://www.remember-our-heroes.nl/us_401stBG.htm
|
Phoenix
9/9/2007 4:59:26 AM | Hi Swinny
If I can dive in before Ed I am having a similar problem as I want to build a 1/72 "Mary Alice" and the only decals are 1/48 also after reading Georges, book "Maiden USA", no nose art so should be straight forward. What I have done is copy sheets from the net adjust the scale scan or copy and get the decals printed onto clear decal sheet the sharpness does not quite come out but its' better than nothing. You can find decal sheets for letters and numbers apart from 401st yellow letters which seem to be slightly different from the norm but that can get expensive. Some of the Hasegawa kits come with blank white triangles and easily adjusted black triangles but the biggest problem I reckon is nose art. Try Hannants.co.uk pretty good source for stuff. Sorry to but in Ed hope that helps a little.
Best wishes
Dale (the uk one not the historian!)
improvise, adapt, overcome
|
EDanaII
9/9/2007 9:43:43 AM | Don't feel bad about jumping in, Dale. Andy deserves all the attention we can give him considering the noble thing he is doing for our servicemen over there. 🙂
@ swinny
What kind of help do you need, Andy? I'll be glad to help however I can. I used most of the decals that came with my original 1/48 kit. The only decals I created that were not specific to the plane were the "Triangle S" and the bomb markers. You're welcome to those, assuming that "Maid to Order" had an aluminum finish. Otherwise, you'll need to make some for an olive drab aircraft.
Scale shouldn't be a problem, as an experiment I also created a 1/144th scale bomber and simply reduced the size of the images by 1/6. For a 1/72 scale, obviously, you then need to reduce the scale by 2/3rds.
Let me know what else you need, and don't forget to ask our resident expert, Paul Bellamy. 🙂

|
Paul Bellamy
9/9/2007 3:13:21 PM | I've opened a dedicated thread for Maid to Order HERE with what I have so far.
All the best,
Paul
Paul Bellamy

|
swinny
9/9/2007 4:13:18 PM | Let me start by saying , thank you all very much for answering.
The problem Ed is that i haven't got a printer or any experience with decals making what so ever.
The decals which came with the kit are very good to use, but yes the problem is with the triangle S also the number 42-97869 and the letter A and the identification IY-A
Maid to order had a aluminum finish and there isn't any photo of the plane.
So the biggest problem will be the nose art , i don't know if she had one or that it would be just simple letters.
I talk with the Togglier of the Maid to order but he couldn't remember it, because the plane changed a lot between the 614th and 615th.
Most of the time she was called HULA GIRL.
So he thinks it had to be a name in straight letters, i don't know what color , maybe you have an idea ?
But i am so happy to hear that you are willing to help me with the decals, that is really great.
@ Paul . That is some great information , thank you
Andy
_______
 My adoption graves http://www.remember-our-heroes.nl/us_401stBG.htm My adoption graves http://www.remember-our-heroes.nl/us_401stBG.htm
|
EDanaII
9/10/2007 9:38:20 AM | Like I said before, it's the least I can do considering what you are doing for our war dead. 🙂
We'll continue this conversation in the thread Paul started for you.

|
EDanaII
9/12/2007 9:24:36 AM | Since I now have two Hard Seventeens -- I started on a second one only to have the first one returned to me -- I'm thinking about creating a diorama of the crash site. This presents a problem for me since my modelling skills are not that sophisticated. But I think I'm gonna have to give it a shot.
I've been researching the damage, and have come up with a theory of what happened. I'm just sharing it here to see if anyone has any other thoughts.
As the plane was sliding across the ground, the right wheel, which, I think, lost air on impact, probably snagged, bending its main support backwards. I think this forced (not sure the right word for it) the "hydraulic wheel lifter" -- the forward part of the landing gear -- to pull the wheel-well downward and split the nacelle.
Here are the pictures of the crash, if anyone wants to ponder this theory with me. Pay close attention to pics #1 and 5.

|
swinny
9/12/2007 9:56:50 AM | Hello Ed
Your theory looks to be right by watching the pictures.
I have to say , your model is looking very good, i hope i can do that too.
Do you have any pictures of the progress of building the first plane ?
I would really like to see them.
I also read the story about Grimbergen, thats easy for me , i am dutch.
Great story and what wonderful for your father .
_______
 My adoption graves http://www.remember-our-heroes.nl/us_401stBG.htm My adoption graves http://www.remember-our-heroes.nl/us_401stBG.htm
|
Paul Bellamy
9/12/2007 12:45:37 PM | Hi Ed,
Here's some drawings that show the undercarriage assembly and how the nacelle and parts of the leading edge fairing seem to have come away from the internal structure.
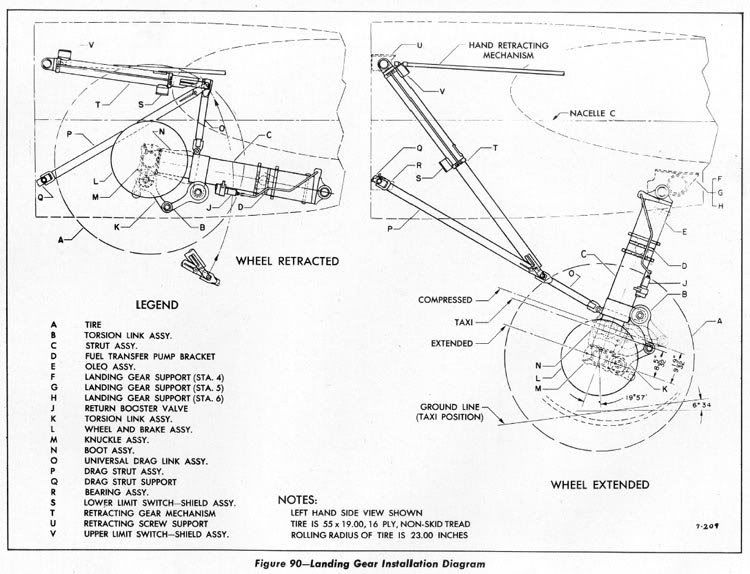
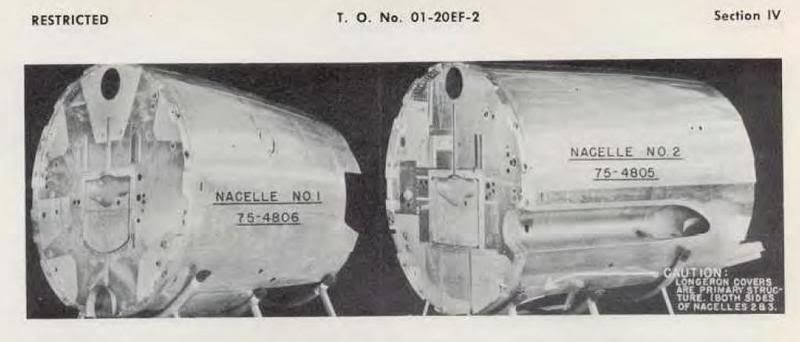
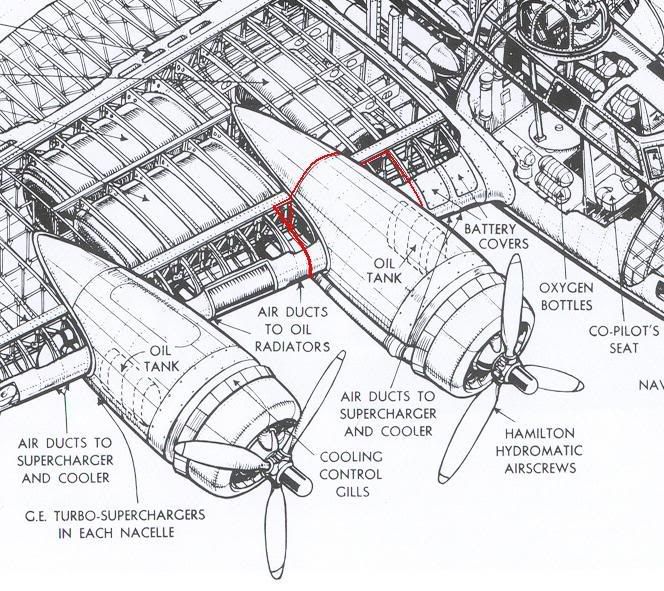
The sub-assemblies can be seen HERE.
All the best,
Paul
Paul Bellamy

|
EDanaII
9/12/2007 3:06:04 PM | Dammit, Paul, you always gotta do me one better. 😉
I actually located the PDF that contains the middle photo there. And I found a guy on the ARC Forums who has a project that includes a detailed wheel well. But figuring out what that bulkhead on the wing looked like was eluding me. You're "sub assemblies" link answers that one nicely. I think I now have all the clues to figure out what should be there. Thanks for that.
Now I just have to figure out what methods I need to do to assemble it. I'm going with the idea of splitting the wing back into it's two original pieces. Cutting (roughly) the top nacelle at the wing, heating the lower nacelle and bending it into position. Gonna be tricky for me, but, once again, I think it will be worth it if I can pull it off.
@ Swinny
The only pictures I have are the ones you see on this thread, on that web page and my personal website. Not much more than that, sorry.
Thanks for the compliment. I am proud of what I managed in making the plane. Especially for someone of my skill level.
You can read the newpaper articles? Did I translate them correctly? I used babelfish and then got creative with what didn't make sense.

|
swinny
9/12/2007 4:18:28 PM | Yes the translation was correct.
Great job
Your website and personal website isn't working for me, i cant get through !
Today my B-17G had to arrive in the store, but unfortunately .
They say that it could take some time, because it is a hard to find model.
Too bad, but now i can start on the control tower, that will be a lot of work.
Andy
_______
 My adoption graves http://www.remember-our-heroes.nl/us_401stBG.htm My adoption graves http://www.remember-our-heroes.nl/us_401stBG.htm
|
Paul Bellamy
9/12/2007 5:31:19 PM | Cheers Ed. 😉
I have a feeling you're going to be reaching for the tin-foil to do this job.
I've pulled out my old 1/48th wing I did the foiling tests on, it's the wrong side but will do for me to work from. I can't find the starboard wing, so will have to go with what I have...
Looking at the top of the nacelle, the panel line on the nacelle doesn't follow the line of the front spar of the wing.
The front spar is the double line of marks that run almost to the wingtip directly behind the leading edge.
Looking at the underside, you'll see the main attachment point for the undercarriage leg is between the front and rear spars, both marked on the upper and lower surfaces.
So...... cutting wise.
Firstly, before you get the saw out, grab the foil and make a (rather delicate) copy of the leading edge panel either side of the nacelle.
Put these in a safe place, where they won't get squashed, and order some sheets of plasticard and new scalpel blades. 😉
The cuts on the upper wing need to be between the battery cover and the nacelle on the fuselage side of the nacelle, and between the access hatch and the nacelle on the other side, both back to the front spar line.
Hmmm, reading back through this, it's probably easier to explain if I do some drawings. Back soon.
All the best,
Paul
Paul Bellamy

|
Phoenix
9/13/2007 3:01:34 AM | Andy
If you are struggling to get hold of a model try e-bay or hannants and may I suggest Hasegawa rather than Acadamy as the accuracy is much better. Maybe one of us in the UK can locate a model for you my recollection of living on the continent is of good model shops being rare.
Dale
improvise, adapt, overcome
|
swinny
9/13/2007 7:12:51 AM | Thanks phoenix, really , thank you.
But i had to make a down payment for the order, so i will stick to that for now.
If everything goes right it will be here next Wednesday.
i just checked out the hasegawa , but it has raised panellines and academy not.
And yes , model shops are getting rarer here, there isn't much interest for.
I am just back from Scotland ( holiday ) and was hoping to find something there , but i didnt found anything.
Andy
p.s. ,
_______
 My adoption graves http://www.remember-our-heroes.nl/us_401stBG.htm My adoption graves http://www.remember-our-heroes.nl/us_401stBG.htm
|
EDanaII
10/2/2007 12:43:48 PM | In further researching what I need to do should I build a diorama, I must now turn my attention to this question. Is this tail damaged?

Or is it just an unusual tail configuration?
It looks too smooth to be damage, but I don't recall seeing to many B-17s with that tail configuration. Early models up through the D had a different tail configuration, but nothing like this.

|
EDanaII
10/2/2007 1:31:10 PM | Researching it a little further, I find that the XB-15 did have a similar. if not exact. configuration.
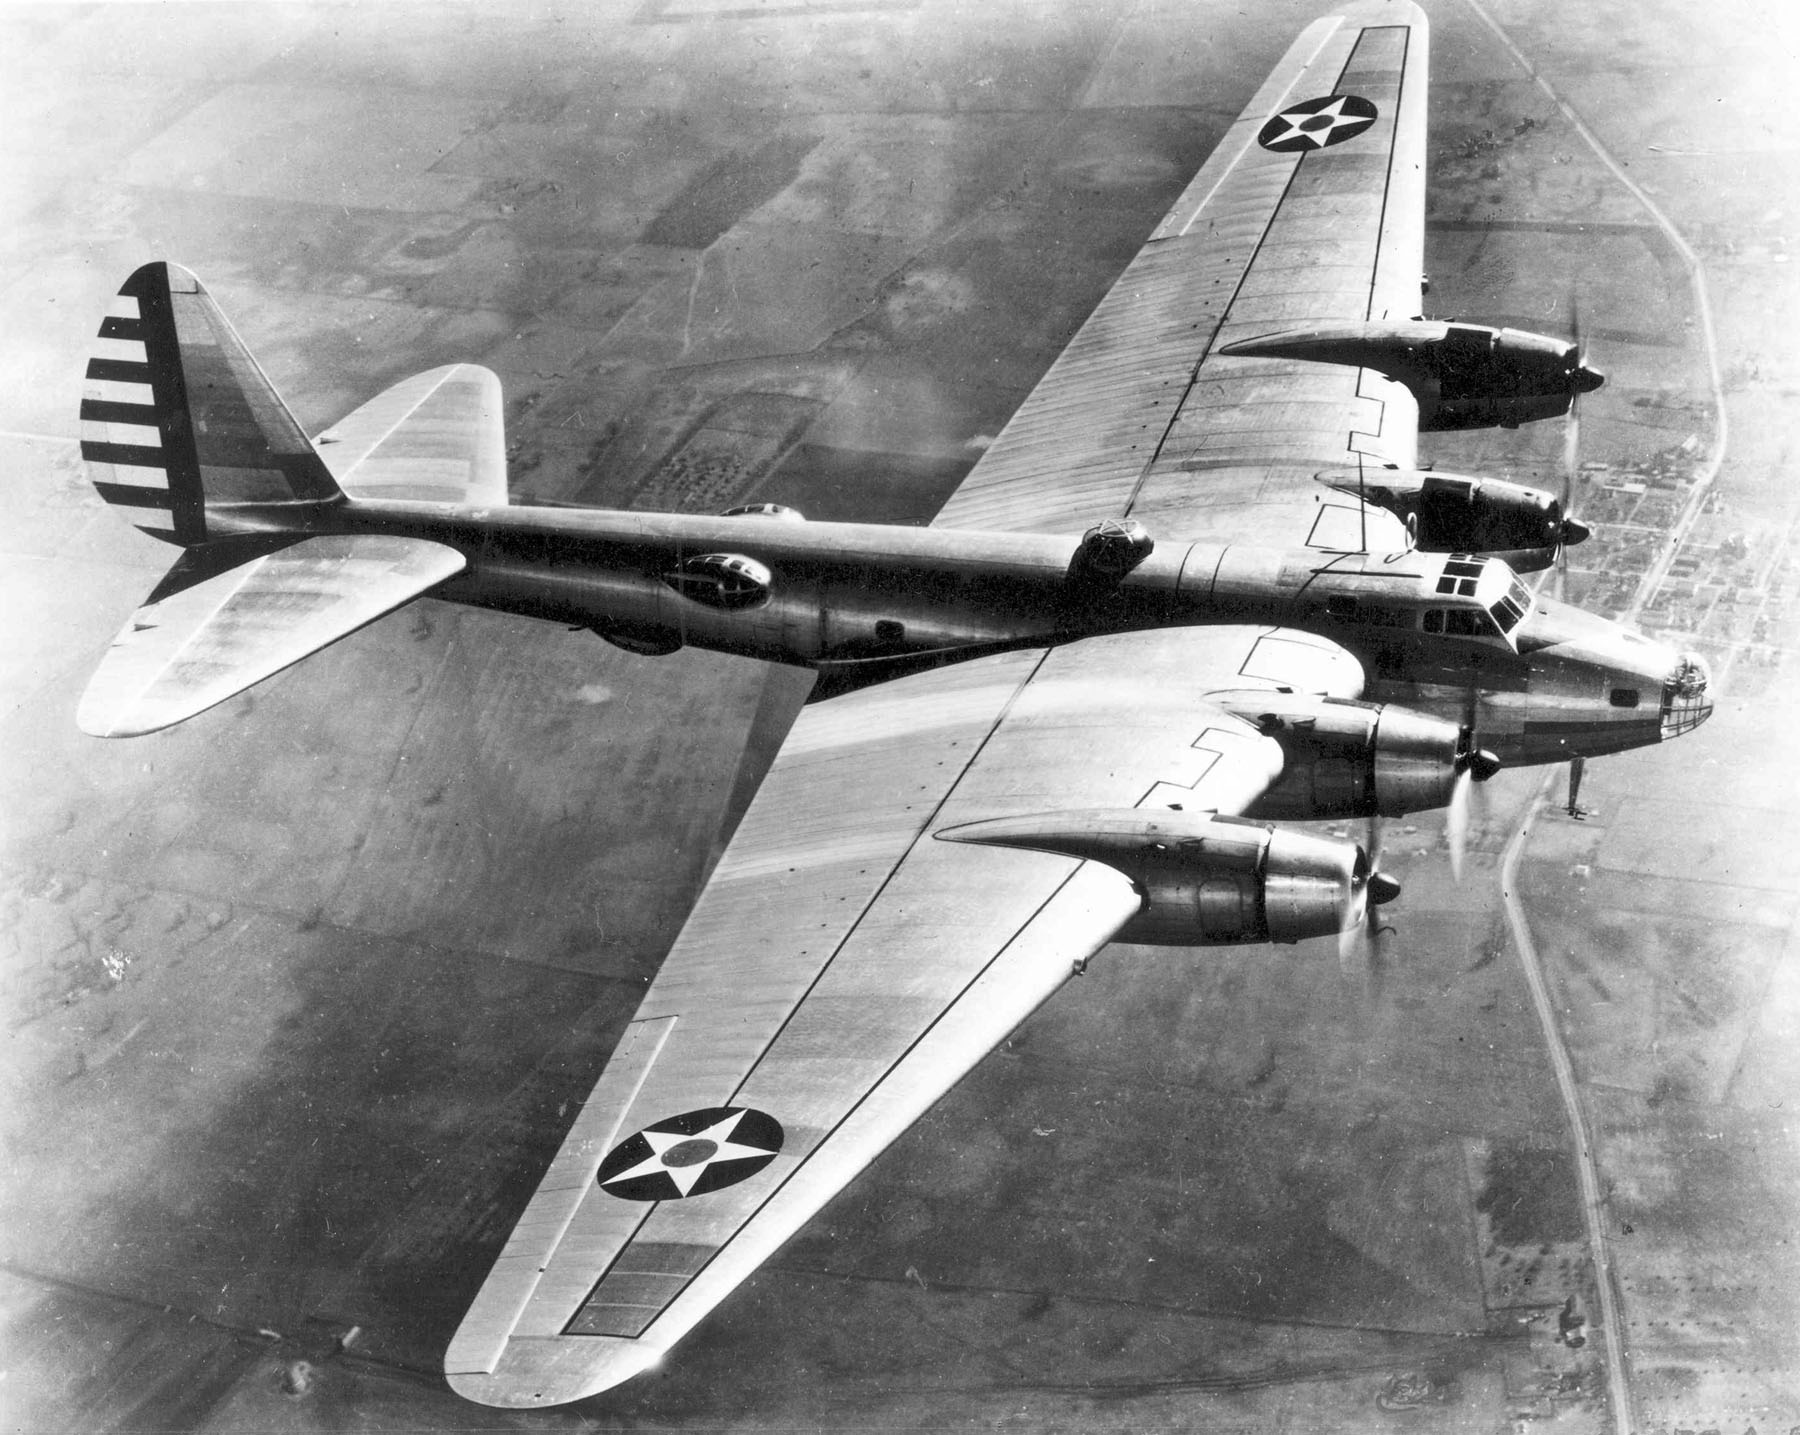 b b
I was thinking that maybe the tail was scavenged off of some other plane, but... an XB-15? That's a bit of a stretch.

|
EDanaII
10/2/2007 3:37:33 PM | Reading from George Menzel's book, "The Portrait of a Flying Lady" I find this: "(Lt. Thompson) put (the Hard Seventeen) down on the crest of a hill and the entire tail section aft of the waist door broke off."
Looking at the photos, I think I can clearly state that the entire tail section aft of the waist door is not broken off. However, I'm assuming that something MUST HAVE broken off in order for the pilot to report that. One thought that does keep bothering me is the fact that the tail section does appear to be too short, so I'm thinking Menzel got it wrong and it was "the entire tail section aft of tail-gunner's door broke off." There is a small door just underneath the right stabilizer that the tail-gunner can use to get out. I think that may be the door being referred to.
It's still hard to tell from the photos, and that curvature looks too smooth to be damage, but this is seeming more and more the likely explanation here. And, yea, that one piece standing up-right may very well be the gunner's section. It's just so hard to tell.
This may be too challenging for me. I assume I have to break open the tail, expose some ribs and twist some metal. No small challenge for someone with my meager skills.

|
EDanaII
10/3/2007 6:20:15 PM | I'm thinking that the "bump" above the stabilizer could be the tail-gunner's position. If you measure it, and then draw a line from the area of breakage out an equal distance, it does extend to about where the tail gun would have been.
In the photos, you see a number of people staring into the tail section. I'm suspecting that, when the plane came to a stop, it broke off, but was still left hanging to the hull. I suspect that people, when they came to inspect the wreckage moved that section off to the side. I suspect it is pretty heavy, but I think it could be pushed to one side.
Here is an illustration of how I think it broke:

That does fit what we see in the picture, possible including the "bump" behind the stabilizer.

|
EDanaII
10/4/2007 11:36:01 AM | This is quickly becoming my theory on how the tail was damaged: Dad talks about how they bounced across two hills. They had lost all but one engine, and I suspect the pilot's "angle of attack" was pretty high. I think this explains why the rudder looks so smooth. It was bent, not torn, as the plane struck tail first, across either hill.
The only question left for me is whether or not the tail busted loose somewhere behind this picture or whether or not that one piece behind the left stabilizer is, in fact, the tail-gunner's station.

|
Paul Bellamy
10/6/2007 11:38:48 AM | Back from Scotland now, and raring to go... after a few hours sleep.
I'll have a browse through some photos of similar tail damage and report back if I find anything of use.
First thought:
I've not looked at the photos of the other side, but as the rudder is a fabric covered metal framework, the armoured roof of the tail gunner's position could have twisted it to one side if it came upwards in the impact with the rudder off-centre.
This would account for the smooth curve of the lower edge of the rudder, the framework being twisted but the fabric still being intact.
Will think better after some rest, back soon,
Paul
Paul Bellamy

|
Paul Bellamy
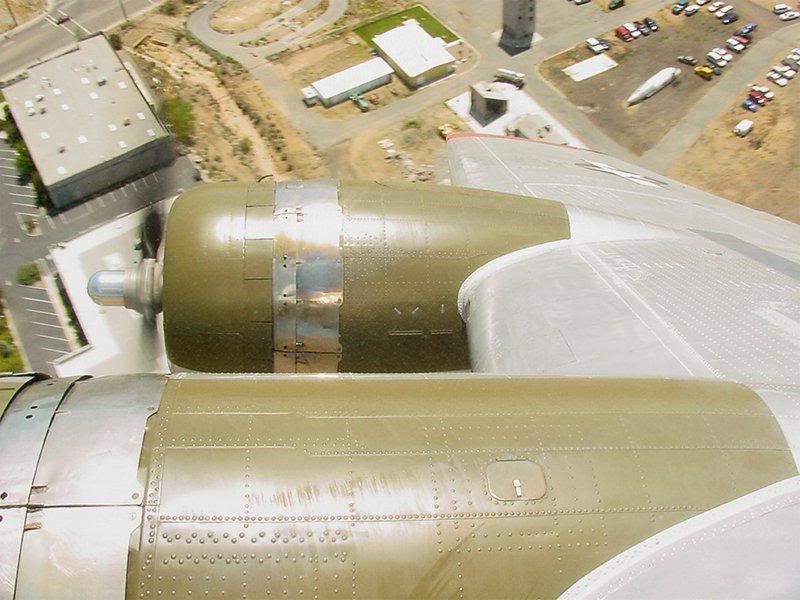
10/7/2007 9:09:07 AM | I've done a quick model of how the inner structure of the wing looks around the inboard nacelle.
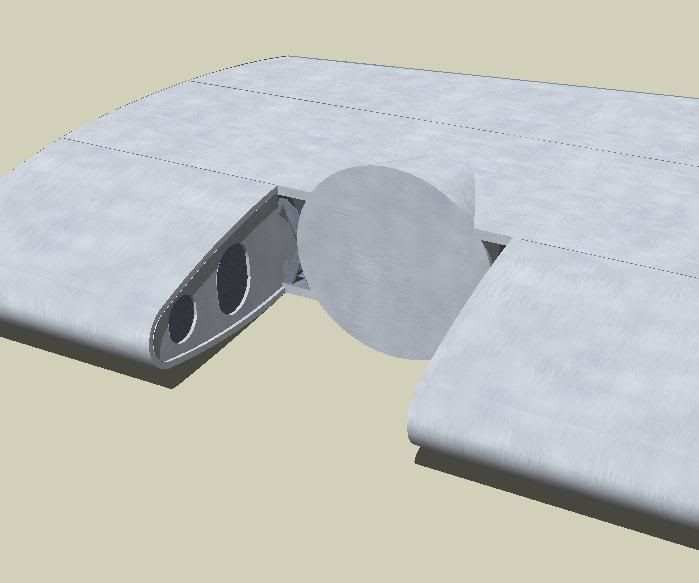
The formers are simple flat panels with two oval holes, and the mainspar is a basic diagonal ladder frame.
Here's a photo of the inside of the wing, the former with the holes in can be seen at the back:
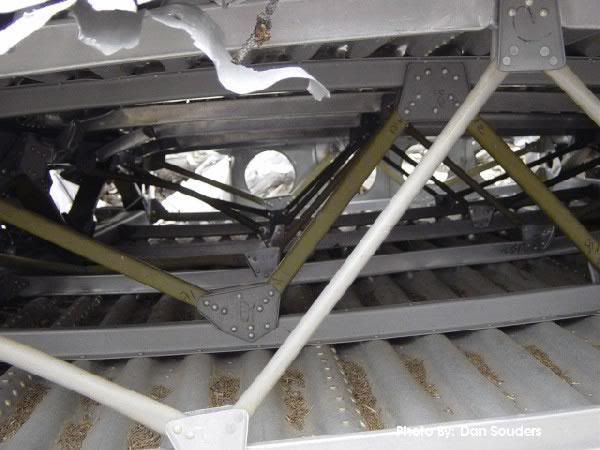
Here's a photo showing a bit more detail of the nacelles:
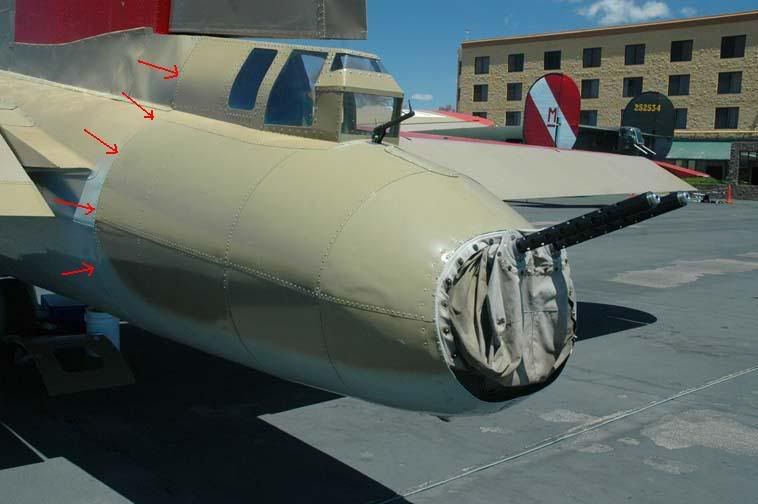
Regards where the tail section split, looking at the photo I think it went where the tail turret was bolted to the fuselage. (That's where they usually broke too):
And finally, because I found it while looking for the above photo's, a picture of the waist gunner's station from the manual:
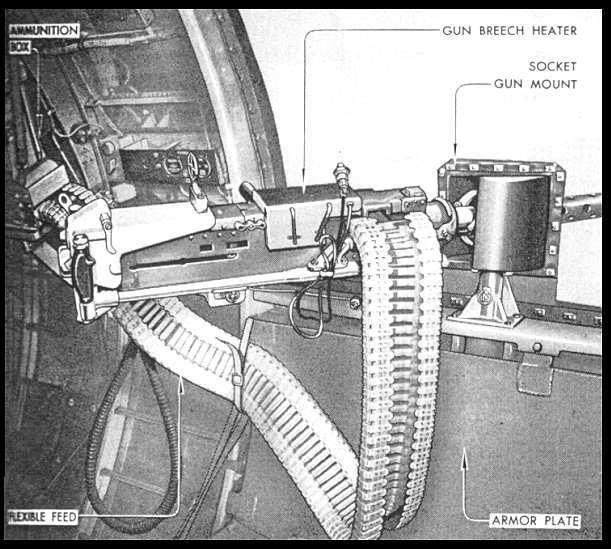
All the best,
Paul
Paul Bellamy

|
EDanaII
10/10/2007 9:26:59 AM | As always, thanks Paul.
I agree that it must have snapped cleanly where it was bolted. But tail gunner's canopy on the main fuselage also appears to be angled. I'm not sure if this damage is ripping or bending. Since it does not appear to be jagged, I'm assuming this section got bent on impact too. However, the piece that I suspect is the tail section does appear to be jagged, but it could also be bending seen at an angle.
As best I can figure it, it snapped on impact, got pushed into the tail, causing that curving effect AND pushing the gunner's canopy on the main fuselage back. I also assume that the canopy on the broken section must also be crushed and twisted from impact.
I still have no idea how I'm gonna do such an effect should I attempt it. Sawing it off I can do. Simulating all the twisting and bending from the impact... no clue. I can do the heating technique I described for the #3 engine, but coordinating all that so that it's consistent with what we see on the main fuselage, the rudder and the waist-gunner's station... difficult at best.

|
EDanaII
12/24/2007 10:55:29 AM | 

|
Phoenix
12/24/2007 11:49:52 AM | The same to you Ed and all with an interest in the 401st
improvise, adapt, overcome
|
EDanaII
6/29/2008 1:15:43 PM | I've been meaning to update this lately, but... so many distractions, so little time.
I received an email from Frans a few weeks back. Belgium has a holiday they call "Monument Day" which, as I understand it, means that all their national monuments are opened up for public access for all to see. This includes, it seems the aerodrome where my father's plane was attempting to land when it crashed. According to Frans, included in the history of aerodrome will be the crash of the Hard Seventeen and my father's return to that place.
So, my father gets a few additional seconds added to his 15 minutes of fame. Thanks Frans! You duh man! :mrgreen:

|
EDanaII
9/30/2008 11:39:28 AM | Just for giggles, I'm resurrecting this thread.
More to the point, as some may remember my father's trip to Belgium last year to visit the site of his 63 year old plane crash, I've since found more photos of the trip from our Belgian friends.
Just follow this link: www.EdwardGDanaII.info
Click on the link at the bottom labeled "Albums." Then scroll to the bottom for the section labeled "Hard Seventeen." There you will find photos from our good friend Paul Van Caesbroek, the Broken Wings Museum (BAHAAT), and the Belgian Military.
As always, enjoy! 🙂

|
swinny
9/30/2008 12:25:36 PM | Great to see Ed , thanks.
Did you had any luck with the emails I translated for you ?
Gr Andy
_______
 My adoption graves http://www.remember-our-heroes.nl/us_401stBG.htm My adoption graves http://www.remember-our-heroes.nl/us_401stBG.htm
|
EDanaII
10/1/2008 10:42:28 AM | Frans liked the thank you notes very much and even asked me who did the translations. Naturally, I mentioned you and the wonderful thing you are doing for our fallen soldiers over there. I still haven't received the photos from the event that Frans promised, but I'm sure I will eventually.
Thanks again, my friend. I owe you for the help. If you ever need any bad advice, you have my email address. 😉
Ed.

|
EDanaII
7/16/2009 10:28:18 PM | Just for giggles, I've created a KML file for Google Earth that contains locations from the Hard Seventeen. While this is an experiment, I'm going to play with it and add more details in the future.
For anyone who is interested in playing with this, here's the link to the KML file. Save it to your desktop as a KML file. You need Google Earth, of course.
And if you decide to play with it, and encounter any issues, please let me know so I can fix them.
Enjoy,
Ed.

|